
This is a tweaked version of a journal entry for the Microsoft Game Developer Network, that’s been cleansed of any non-public Xbox 360 specifics. If you’re a registered developer, I encourage you to check out the uncut edition available there, for full implementation details.
Introduction
PIX for Xbox 360 is an excellent application for deep analysis of a rendered frame. But, like a scalpel, it’s a precision instrument for dissection and surgery, not for general use and certainly not for the faint of heart. Instead, our Swiss Army knife should be the engine itself. With an array of real-time visualisation modes – anything from MIP level selection to world-space normals – to hand, one can slice through (or at least short-cut) a wide range of graphics-related debugging and profiling tasks during development, and avoid bringing out the ‘big knives’ unnecessarily. Besides the obvious speed benefits, these modes are typically much more approachable than PIX for non-technical artists, who might otherwise be dependent on programmers for help.
One indispensable display mode is overdraw, which provides a quick way to identify potential hotspots such as fill-heavy particle systems or dense, alpha-tested foliage. This is typically achieved by overriding regular shading to output a constant colour, and additively accumulating this for all depth-passing pixels during relevant sections of the frame. One can go further and vary this colour based on the original shading cost of each draw call, but for the scope of this post I’ll focus on how it can be improved in other ways.
Better Overdraw
Figures 1 shows the isolated depth complexity and overdraw, respectively, of a couple of characters within a scene. The right-hand image is rather unexciting, as only a single layer of drawing is present, due to a lack of multi-pass lighting or transparent materials, plus the utilisation of a z pre-pass (the overdraw of which has not been included).
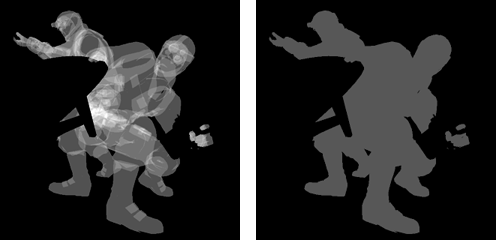
Figure 1: Depth complexity (left), standard overdraw (right).
From this, we might conclude that the z pre-pass has perfectly eliminated redundant lighting and shading in subsequent rendering. However, our standard debug view is failing to capture one additional source of waste: hi-z overdraw.
Due to the reduced precision and resolution of the hi-z buffer, quads may be shaded conservatively, only to be discarded later by the standard z-buffer. This is shown in Figure 2, which includes the rest of the scene for clarity:
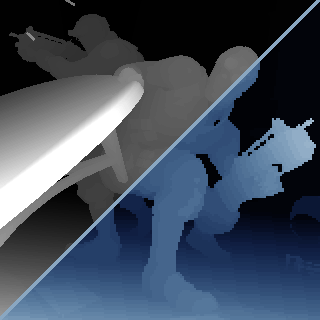
Note the coarser granularity and quantisation in the latter.
Although PIX can display hi-z overdraw, we would naturally like to replicate this within our own game mode. Fortunately, this is easily achieved; the steps are as follows:
- Set
D3DRS_HIZENABLEtoD3DHIZ_ENABLE - Set
D3DRS_ZFUNCtoD3DCMP_ALWAYS - Render all geometry with an overdraw pixel shader, as before
- (Revert the previous render state changes!)
With these modifications, fine-grained depth testing is effectively bypassed, but the GPU continues to check the hi-z buffer, because we’ve forced it on with D3DHIZ_ENABLE (instead of the default, D3DHIZ_AUTOMATIC). Figure 3 shows this in action:
Figure 3: Hi-z overdraw.
True Overdraw?
If only it were that easy; this still isn’t the whole truth as far as overdraw goes on Xbox 360, or with any modern GPU for that matter. Because pixel shading happens at the granularity of a quad, some pixels along triangle edges are processed but then later ’thrown away’ (masked out), because they lie outside of the primitive. This wasted computation can really mount up with small triangles, leading to significant overdraw – or more accurately overshading – for otherwise opaque, non-overlapping geometry.
What we’d really like is the same kind of visualisation as [Fatahalian 10], i.e. accumulating the overdraw of all shaded pixels, even the discarded ones. Sadly, there doesn’t seem to be a way (at least that I know of) to simply instruct the hardware to retain dead pixels. We can’t even use memory exports as a backdoor, since these get masked just like any other shader output! Through a little bit of shader black magic however, it is in fact possible to conjure up a mode that exactly matches what we want!
The Solution
Now, this will probably seem like a bit of a ‘code tease’, but I can’t go into the lowest-level details in this sanitised post. That said, I can give you a full picture of the process.
At a higher level, the existing pixel shader is modified so that it only writes overdraw for the first live pixel in every shaded quad. The results are then post-processed in an additional full-screen pass that gathers and sums up the overdraw for each pixel and its quad neighbours. The final tally is then passed through a LUT, for clearer visualisation. Essentially, each quad is recorded once and expanded later, via “scatter as gather”.
The main shader first determines whether the active pixel is dead or not and then uses a second undocumented method for determining the pixel’s position within its vector. Armed with this data, the shader finally proceeds to establish if there are any live pixels before it in the same quad.
Neighbouring pixel information is accessed indirectly via the branch attribute [isAny] (see [Pritchard 10]), which checks the state of all 64 pixels in the vector. By itself, [isAny] can be a blunt tool, but in conjunction with the vector index, we can be very specific with the conditional and effectively ascertain the state of any pixel in the vector (Listing 1).
At this point, you might consider abusing the partial derivative functions ddx() and ddy() instead (as in [Penner 11]), in order to glean details about quad neighbours more succinctly. Unfortunately, this won’t work since the Xbox 360 GPU uses forward differencing for calculating derivatives.
With that aside, here’s a summary of the new process:
- Set
D3DRS_HIZENABLEandD3DRS_ZFUNC, as before - Render all geometry with the new quad overdraw pixel shader (Listing 1)
- (Revert the previous render state changes!)
- Resolve the results to a texture
- Post-process with a full-screen pass (Listing 2)
Finally, the results of this process are shown in Figure 4:
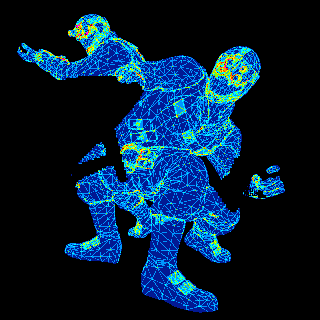
Figure 4: True quad overdraw.
Conclusion
The initial hi-z overdraw debug mode proved invaluable during the development of Splinter Cell: Conviction. It aided us on the programming side when testing out optimisations such as mesh LOD, and on the art side, highlighting needless overdraw from thin, layered geometry, that might otherwise have gone unnoticed. I’m now looking forward to employing this improved version in production and I hope you find it useful too!
Acknowledgements
Major credit goes to David Cook and Jason Gould of the ATG, for illuminating correspondence on obscure features and tricks that were critical to the implementation. I would also like to thank Steve Anichini, who originally posed the question of whether pixel-quad overshading could be displayed in real-time. Finally, many thanks to Francis Boivin, Mickael Gilabert, Richard Sim and Jean-François St-Amour for constructive feedback on the original version of this article.
References
[Fatahalian 10] Fatahalian, Kayvon, “Evolving the Direct3D Pipeline for Real-Time Micropolygon Rendering”, Beyond Programmable Shading course, SIGGRAPH 2010.
[Penner 11] Penner, Eric, “Shader Amortization using Pixel Quad Message Passing”, GPU Pro 2, 2011.
[Pritchard 10] Pritchard, Cody, “Xbox 360 Shaders and Performance: How Not to Upset the GPU”, Gamefest 2010.
Listings
 1// i_am_dead: dead, or maybe just restin'?
 2// q_pos:     position of the pixel within its quad
 3// quad:      index of the pixel's quad within the pixel vector
 4
 5float overdraw = 0;
 6
 7// Loop over all quads
 8for (int i = 0; i < NB_QUADS_IN_VECTOR; i++)
 9{
10    float4 alive_before_me = 0;
11
12    // Loop over all pixels in this quad
13    for (int j = 0; j < 4; j++)
14    {
15        [ifAny]
16        if (!i_am_dead.x && quad == i && q_pos < j)
17            alive_before_me[j] = 1;
18    }
19
20    // If we're in this quad and we're the first live pixel,
21    // then accumulate the overdraw
22    if (quad == i && !alive_before_me[q_pos])
23    {
24        // Note: 4.0 here in order to get _fractional_ overdraw if MSAA is enabled
25        // (the LUT in the final pass is sampled with LINEAR filtering)
26        overdraw = 4.0/255;
27    }
28} 1sampler2D quad_overdraw;
2sampler2D lut;
3
4float4 tfetch2D(sampler2D s, float2 t, bool un, float x, float y)
5{
6 float4 v;
7 asm { tfetch2D v, t, s, UnnormalizedTextureCoords = un, OffsetX = x, OffsetY = y };
8 return v;
9}
10
11float4 main(float2 pos : VPOS) : COLOR0
12{
13 // Gather overdraw in quad
14 float4 v;
15 float2 uv = floor(pos/2)*2;
16 v.x = tfetch2D(quad_overdraw, uv, true, 0, 0);
17 v.y = tfetch2D(quad_overdraw, uv, true, 1, 0);
18 v.z = tfetch2D(quad_overdraw, uv, true, 0, 1);
19 v.w = tfetch2D(quad_overdraw, uv, true, 1, 1);
20
21 // Merge results
22 float overdraw = dot(v, 255/4.0);
23
24 // Color-code for display
25 return tfetch2D(lut, overdraw, true, 0.5, 0);
26}